Tiki Hut Lighting Ideas: A Practical, Field-Tested Guide
Disclosure: Some links below are affiliate links. If you purchase through them, I may earn a commission at no extra cost to you.
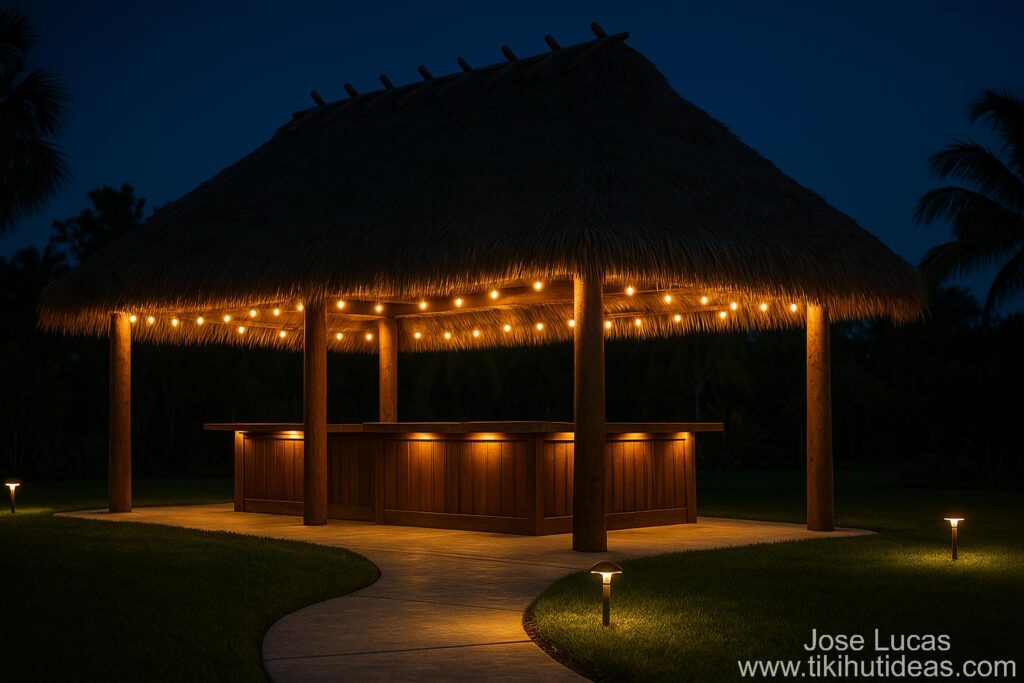
When I light a tiki hut, I aim for three things: warm color, low glare, and gear that survives weather and salt air. The recipe below is what I actually install in real projects—simple, durable parts you can add in an afternoon or a weekend. I’ll show you the exact components I reach for, explain why they work, and link to reliable options so you can pick up everything without chasing specs.
Start with a Warm Ambient Layer
The “tiki feel” comes from soft, even glow—not spotlights. I create that baseline in two steps. First, I trace the inside of the eaves with weather-rated string lights so the light washes the thatch and beams. Second, I add a subtle under-beam glow with low-voltage pucks or waterproof LED strips in channels. Keep color temperature warm (about 2200–2700K) and aim fixtures so guests see light, not the LED diodes.
Dependable picks I like: shatter-resistant 48-ft outdoor string lights for the eaves, compact 12V “puck” lights under beams, and a waterproof strip such as this IP67 warm COB strip kit set inside aluminum diffuser channels for clean lines and no glare.
Add Task Light at Bars, Prep & Tables
Bars and prep counters need targeted light that doesn’t blast eyes. I run a warm strip under the bar lip or upper shelving for an even wash, then I place one or two adjustable mini-spots aimed at work surfaces (not at faces). Because task light is brighter by design, I keep it on its own control so it can dim back once the crowd settles in.
For the strip, the same IP67 warm COB strip in channels gives a professional edge glow. For aimable light, compact 12V adjustable spots do a great job focusing light exactly where you need it.
Mark Paths, Steps & Edges
Subtle markers make circulation safe and make the hut feel finished. Along walk-ups and patio edges, I use warm, low-glare path lights. At the perimeter, tiny downlights tucked under the eaves outline the structure without showing hardware. If you accent a palm or post, use a shielded uplight and keep it off to one side so you don’t create glare in the seating area.
A reliable path kit: 3W low-voltage pathway lights (warm). For discrete downlighting and accenting, pair with adjustable mini-spots and mount carefully to avoid hot spots.
Controls that “Just Work”
Good control is the difference between lights you love and lights you forget to use. I keep ambient, task, and accent on separate zones. For scheduling, a weather-rated smart plug on the eave lights and a timer or photocell on the low-voltage transformer keeps everything consistent from sunset to shut-down.
For a simple setup, use a weather-resistant smart plug (dual outlet) for your plug-in circuits, and a transformer like this 120W low-voltage unit with photocell & timer for 12V runs. Keep any high-voltage work on GFCI-protected circuits and handled by a licensed pro.
Power & Wiring Basics (Quick, Reliable)
For low-voltage, add up the wattage of your fixtures and choose a transformer with at least 20–30% headroom so you can grow later. Use outdoor-rated cable, form drip loops before any box or fixture, and protect every splice from splash. If a far run looks dim, shorten the circuit or bump the wire gauge.
- Cable: Direct-burial 12/2 or 14/2 is my default for 12V lighting. Here’s a reliable 12/2 landscape cable.
- Protection: Keep splices inside a weatherproof connection box; cover receptacles with an in-use cover.
- Cable management: Secure runs neatly along beams and purlins with stainless P-clamps and screws.
Mounting Under Thatch (No Penetrations)
I never pierce the thatch. Instead, I mount hardware to wood members: beams, rafters, or purlins. LED runs cool, which is exactly what you want beneath a natural roof. Keep drivers and transformers ventilated (not buried in thatch), and avoid placing any hot component directly under a thatch layer. Aluminum channels double as heatsinks for strips and make the installation look finished.
Coastal & Storm Notes
In coastal zones, corrosion is the enemy. I default to stainless or hot-dip galvanized fasteners and wet-location boxes with proper gaskets. Use IP65 or better on fixtures that see spray. After storms, re-form drip loops, check lens gaskets, and tighten clips—five minutes of maintenance saves hours later.
My Baseline Kit (What I Actually Use)
If you want to assemble a dependable kit quickly, these links cover ambient glow, task zones, accent markers, control, wire, and weatherproof bits:
- Outdoor string lights (warm, shatter-resistant)
- 12V beam-mount “puck” lights (selectable warm)
- IP67 warm COB strip (outdoor) + aluminum channels
- 120W low-voltage transformer (timer/photocell)
- Outdoor smart plug (dual outlet)
- Low-voltage path light kit (warm)
- Adjustable mini-spots (12V)
- 12/2 landscape cable
- Weatherproof junction/connection box
- Extra-duty in-use outlet cover
- Stainless P-clamps & screws
Quick How-To (What Order I Install)
- Run the ambient layer first: trace the eaves with the string lights, then add pucks or strips in channels under beams.
- Add task circuits at bars and prep: under-bar strip, then aim two mini-spots at key work areas.
- Place safety markers last: path lights along walks, tiny downlights under the eaves near edges or steps.
- Terminate all splices inside a weatherproof box, form drip loops, and test each zone.
- Program the smart plug and transformer timer so ambient comes on at sunset and shuts down automatically.
Troubleshooting (Fast Fixes)
- Some fixtures look dim: Shorten the run, increase wire gauge, or split the circuit so far lights aren’t starved.
- Glare in the seating area: Rotate fixtures so the beam skims surfaces; add a diffuser channel or move the light higher.
- Water in a box: Re-form the drip loop and check the gasket; protect the connection inside a sealed housing.
- Too bright overall: Dim the task layer first, then the eave glow; keep path lights steady for safety.
Planning a new build or an upgrade? Check our Design Albums for layout ideas
Safety note: Always follow local codes and manufacturer instructions. Hire a licensed electrician for any line-voltage work and GFCI protection.