Tiki Hut Sound & Power: Discreet Speakers, Outlets & Charging
Disclosure: Some links below are affiliate links. If you purchase through them, a small commission may be earned at no extra cost to you.
Music, power, and tidy wiring turn a tiki hut from a shade structure into an all-day hangout. The challenge is doing it
quietly—gear that hides in the frame, wiring that disappears, outlets that shrug off weather, and a sound system
that fills the space without blasting the neighbors. This guide walks through planning, gear choices, wiring paths,
speaker placement, power protection, and maintenance—plus quick shopping links for field-proven parts.
Quick Navigation
- Plan First: Zones, noise, and use cases
- Speaker Approaches (portable, marine, landscape)
- Placement That Sounds Better (and looks cleaner)
- Amplifiers, Sources & Connections
- Wire, Conduit & Cable Management
- Power & Protection (WR/GFCI, in-use covers, surge)
- Three Proven Setups (step-by-step)
- Tuning: clear voices, warm music, happy neighbors
- Maintenance & Troubleshooting
- Quick Shopping List
- FAQ
Plan First: Zones, Noise & Use Cases
Start with how the hut is used. A quiet coffee corner wants gentle background music. A bar hut needs stronger mid-bass where people congregate.
A pool-adjacent hut may need the speakers pointed away from the water to reduce reflections. Make quick notes:
- Zones: Dining table, bar, lounge, or deck extension. Each zone suggests a speaker pair or a controllable “A/B” output.
- Neighbors: Orient speakers toward your seating and away from property lines. Lower bass at night—bass travels.
- Weather: Salt, splash, and sun angle determine mounting height and which finishes last.
- Controls: A simple remote or a wall control by the bar keeps volume adjustments off your phone when hands are wet.
Speaker Approaches
Every hut can land in one of three lanes. Pick the lane first; the rest of the decisions get easy.
- Portable wireless: Fastest setup—place one high on a shelf or bar back and you’re done. Great for renters or seasonal sites. Look for IP ratings and long battery life.
- Weather/marine speakers + compact amp: Best sound per dollar for fixed huts. 6.5″ coaxial pairs mounted under beams deliver clear vocals. Marine coatings resist salt and humidity.
- Landscape audio: For large patios or resorts, a small underground sub with two to four satellites spreads sound evenly at modest volume.
Placement That Sounds Better (and Looks Cleaner)
- Under-beam & inward angle: Mount speakers on the inner face of a beam, ~8–10′ apart, tilted slightly down and toward the seating area. This increases clarity at low volume.
- 1/3-rule: If using two speakers on a beam, place each roughly one-third of the span in from the posts; you get even coverage without hot spots.
- Avoid the ridge echo: Mounting at the peak can reflect sound off the floor. Under-beam placements damp that echo.
- Landscape aim: Satellite speakers should aim across the space, not at a wall or water. Keep them off pathways and at consistent heights.
Amplifiers, Sources & Connections
In most tiki huts, a small Class-D amplifier paired with a phone or tablet (via Bluetooth or aux) is more than enough. If you need multiple zones,
choose an amp with A/B outputs or use two compact amps so the bar and lounge can be set independently.
- Power headroom: For a pair of 8-ohm speakers, 50–100 watts per channel keeps distortion low at background volumes.
- Impedance basics: Two 8-ohm speakers on one channel in parallel present ~4 ohms; be sure the amp is rated for it. When in doubt, use each channel for one speaker.
- Inputs: Bluetooth is convenient; a 3.5 mm aux input is rock-solid when phones get fussy.
- Mounting: Keep the amp in shade with airflow. Don’t enclose it in an airtight box; electronics like to breathe.
Wire, Conduit & Cable Management
Clean cable work is what separates a pro-looking hut from a tangle. Low-voltage speaker wire should travel along beams and posts with stainless P-clamps or UV-resistant clips.
Line-voltage wiring (outlets, switches) belongs in wet-location boxes and conduit. Keep the two systems physically separate.
- Speaker wire: 16/2 oxygen-free copper is fine for short runs; use 14/2 for longer than ~50′ or for landscape audio. Direct-burial cable for any underground sections.
- Conduit for power: Use liquid-tight flexible non-metallic conduit (with fittings) between boxes if you need a short jump under the roof.
- Raceways: On exposed posts, a brown or wood-tone cord raceway disappears visually and keeps kids from grabbing cables.
- Drip loops & slack: Always leave a little slack at the amp and speaker so you can re-terminate without tugging on the wire.
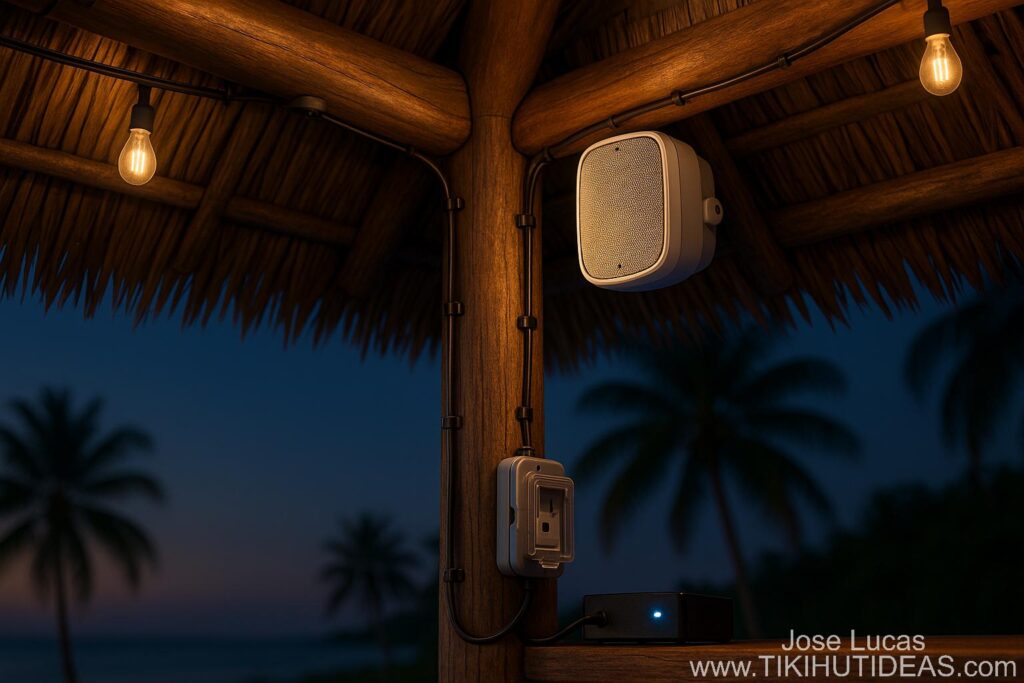
Power & Protection (WR/GFCI, In-Use Covers, Surge)
Power is simple when you follow three habits: weather-resistant components, protection at the outlet, and a clean path for cords.
Keep in mind that line-voltage work should be done by a licensed electrician.
- Outlets: Use weather-resistant (WR) receptacles on GFCI-protected circuits. Mount at a convenient height for bar appliances and chargers.
- In-use covers: Choose extra-duty “in-use” covers so cords remain protected while plugged in.
- Junction boxes: Use gasketed, weatherproof boxes and fittings. Keep connections inside boxes—never hanging under the roof.
- Surge & power quality: Outdoor-rated surge strips or point-of-use surge protection help protect amps and smart plugs during storms.
- USB-C & charging: One covered outlet near seating with a multi-port charger keeps phones off the bar counter.
Three Proven Setups (Step-by-Step)
A) Portable-First (fastest, renter-friendly)
- Pick a waterproof wireless speaker rated for outdoor use.
- Place it on a shelf or beam-mounted tray about chest height, aimed toward seating.
- Add a WR/GFCI outlet nearby with an extra-duty in-use cover and plug-in charger.
- Tidy cords with UV zip ties and a short cord raceway.
B) Marine Pair + Compact Amp (clean, reliable)
- Mount a 6.5″ weather/marine speaker pair under the front beam, 1/3 in from each end, angled toward seating.
- Run 14/2 outdoor speaker wire back to a shaded shelf.
- Install a compact Bluetooth amplifier; connect each speaker to its own channel (8 ohms).
- Power the amp from a WR/GFCI outlet with an in-use cover; add a weatherproof junction box for tidy terminations.
- Secure wires with stainless P-clamps; leave a small service loop at the amp.
C) Landscape System (even coverage for big patios)
- Place a small in-ground sub behind screening plants and two satellites along the edge line, aimed across the space.
- Use a landscape speaker kit and run direct-burial 14/2 in a shallow trench.
- Power a compact amp in a weather-safe location; set crossover so vocals are clear and bass stays warm, not boomy.
- Finish with a weather-rated smart plug so music returns to the last volume with one tap.
Tuning: Clear Voices, Warm Music, Happy Neighbors
- Start flat: Set tone controls neutral, then add a gentle bass bump and a tiny treble lift if vocals sound dull.
- Balance left/right: Sit where guests sit; nudge the angles or level trims so conversation areas are even.
- Night mode: Lower bass by a click or two after dusk. You’ll hear lyrics without broadcasting three lots away.
- Noise courtesy: Point speakers toward the center of your hut, not the property line. It makes a big difference.
Maintenance & Troubleshooting
Outdoor gear lasts longer with five-minute habits:
- Quarterly: Rinse salt film, wipe grills, check clamps and cable ties, confirm in-use cover gaskets close freely.
- After storms: Inspect for wind-pulled cords, water inside covers, and loose terminals; let gear dry before powering.
- Crackling sound: Usually a loose terminal or moisture in a connector. Power down, re-terminate, let dry.
- Bluetooth hiccups: Move the source device closer or run a short aux cable to the amp for mission-critical nights.
Quick Shopping List
- Portable waterproof wireless speaker
- 6.5″ weather/marine speaker pair (fixed install)
- Compact Bluetooth amplifier (sheltered)
- Landscape speaker kit (sub + satellites)
- Outdoor/direct-burial speaker wire (14/2)
- Stainless P-clamps (cable management)
- UV-resistant cable ties
- Cord raceway / concealer (wood-tone)
- Weather-resistant GFCI receptacle
- Extra-duty in-use cover
- Weatherproof junction box
- Outdoor smart plug (weather-rated)
- Outdoor extension cord (12/3)
- Outdoor surge protector
Match wire gauge to run length; use wet-location boxes, covers, and fittings.
FAQ
Do I need two speakers in a small hut? Two speakers at low volume sound better than one playing loud; voices stay clear without hot spots.
How high should outlets be? Enough to keep cords off the floor and out of splash—often 36–42″ near a bar and 18–24″ in a lounge zone. Follow local practices.
Can speakers live in the ridge? They can, but under-beam placements usually sound warmer and hide wiring better.
What about streaming outside Wi-Fi range? Use a portable speaker, store music on a device, or extend Wi-Fi with an outdoor-rated access point.
Finish your setup with our lighting guide and ceiling fan guide. When you’re ready to build, browse the Design Albums or Get a Quote.
Safety note: All line-voltage work should be completed by a licensed electrician. Use GFCI protection, WR devices, extra-duty in-use covers, and weatherproof boxes/fittings.